This article contains affiliate links. If you sign up through my links, I earn a commission at no extra cost to you. This never affects my content — I cover the good and the bad.
So you have signed up for Metricool — or you are thinking about it — and you are staring at a dashboard with about fifteen things on the sidebar and no idea where to start. I have been there. The good news is that Metricool is not complicated once you understand how the pieces fit together. The bad news is that nobody tells you that upfront, so the first ten minutes feel like you have been dropped into a cockpit.
This tutorial walks you through everything from signing up to scheduling your first post, reading your analytics, tracking competitors, and generating reports. By the end you will know your way around Metricool better than most people who have been using it for months.
If you have not signed up yet, grab the free plan here — no credit card required.
Not sure if Metricool is the right tool for you yet? Start with my Metricool Review 2026 where I cover the pricing, pros, cons, and who it is actually best for.
Step 1 — Sign Up and Connect Your Social Accounts
Head to Metricool and create an account. You can sign up with Google or an email address. The free plan gives you one brand with one account per platform and 50 scheduled posts per month — more than enough to follow along with this tutorial.
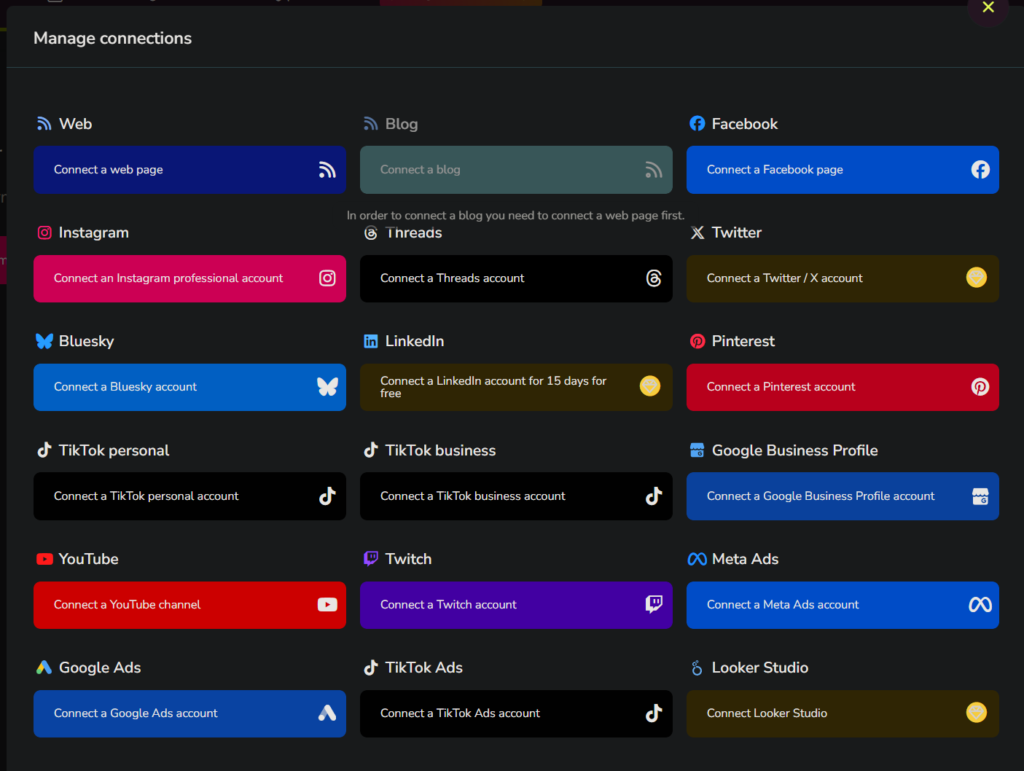
Once you are in, Metricool will immediately ask you to connect your social accounts. Click on each platform icon and follow the prompts to authorise access. Metricool supports Instagram, Facebook, X, TikTok, Pinterest, YouTube, Threads, and Google Business Profile. LinkedIn is available on paid plans only.
A few things to know here. For Instagram, you need a Business or Creator account — personal accounts will not work with any scheduling tool, not just Metricool. If yours is still a personal account, switch it in Instagram settings under Account > Switch to Professional Account. It takes about 30 seconds and it is free.
For Facebook, you need to connect a Facebook Page, not a personal profile. If you do not have a Page for your business yet, create one first.
Connect every platform you actively post on. You can always disconnect or add platforms later.
Step 2 — Find Your Way Around the Dashboard
Once your accounts are connected, you will land on the main dashboard. The left sidebar is your navigation. Here is what each section does, so you are not randomly clicking around.
The Evolution section shows you analytics — follower growth, engagement trends, impressions, and reach over time. This is where you go to see how your accounts are performing overall.
The Planner is where you schedule posts. This is the visual calendar view that shows everything you have queued across all platforms.
The Inbox is your community management hub. Comments, DMs, and mentions from your connected platforms all show up here so you can reply without switching between apps.
The Competitors section is where you add competitor profiles and track their performance. More on that later.
The Reports section generates automated performance reports in PDF or PowerPoint format.
The SmartLinks section is Metricool's link-in-bio tool, which lets you create a custom landing page for your Instagram or TikTok bio link.
Do not try to learn all of these at once. The three you will use most often are the Planner, Evolution (analytics), and Competitors. Start there.
Step 3 — Schedule Your First Post
This is what most people sign up for, so let us get to it.
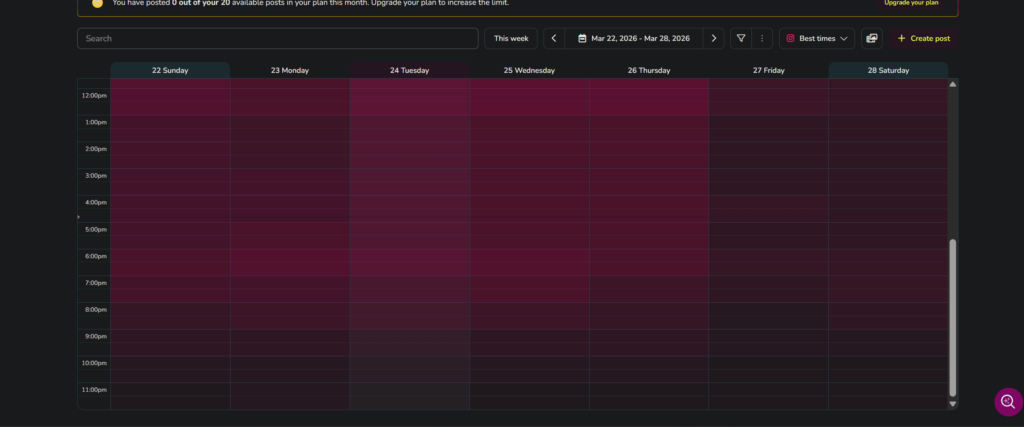
Click on the Planner in the left sidebar. You will see a calendar view — week or month — showing any posts you have already scheduled (which will be empty if you are new). Click the blue plus button or click on a date to create a new post.
The post composer opens up. At the top, you will see icons for each connected platform. Click the ones you want to post to — you can select multiple platforms and Metricool will publish to all of them at the scheduled time.
Write your caption in the main text box. Here is something useful — you can write a single caption for all platforms or click the platform icons to customise the caption for each one. This is important because what works as an Instagram caption (longer, with hashtags) is very different from what works on X (shorter, punchier).
Upload your image or video using the media section below the caption. Metricool will show you a preview of how your post will look on each platform so you can check the formatting before scheduling.
Set your date and time. You have two options here — pick a specific time manually, or use the Optimal Time feature. Metricool analyses when your audience has historically been most active and suggests the best time slots. These show up as highlighted areas on the calendar. For a new account with limited data, the suggestions will be general, but they get more accurate as Metricool collects more engagement data from your posts.
Hit Schedule and you are done. The post will appear on your calendar and publish automatically at the time you set.
Pro tip: if you use hashtags in a first comment on Instagram rather than the caption, Metricool has a "First Comment" field below the caption where you can add those. It will automatically post them as a comment after your post goes live.
Step 4 — Understand the Content Calendar
Once you have a few posts scheduled, the Planner becomes genuinely useful. You can see your entire posting schedule across all platforms in one view.
The calendar shows colour-coded dots for each platform — blue for Facebook, pink for Instagram, and so on. Click on any scheduled post to edit it, change the time, or delete it. You can also drag and drop posts to move them to different dates if your schedule changes.
Switch between week and month views depending on how far ahead you plan. The month view gives you a big picture of your posting frequency — useful for spotting gaps where you have nothing scheduled.
If you are managing social media for a client or a business, this is the view you will live in. Being able to see a full month of content at a glance and make changes with a drag is a massive time saver compared to posting manually on each platform.
Step 5 — Read Your Analytics
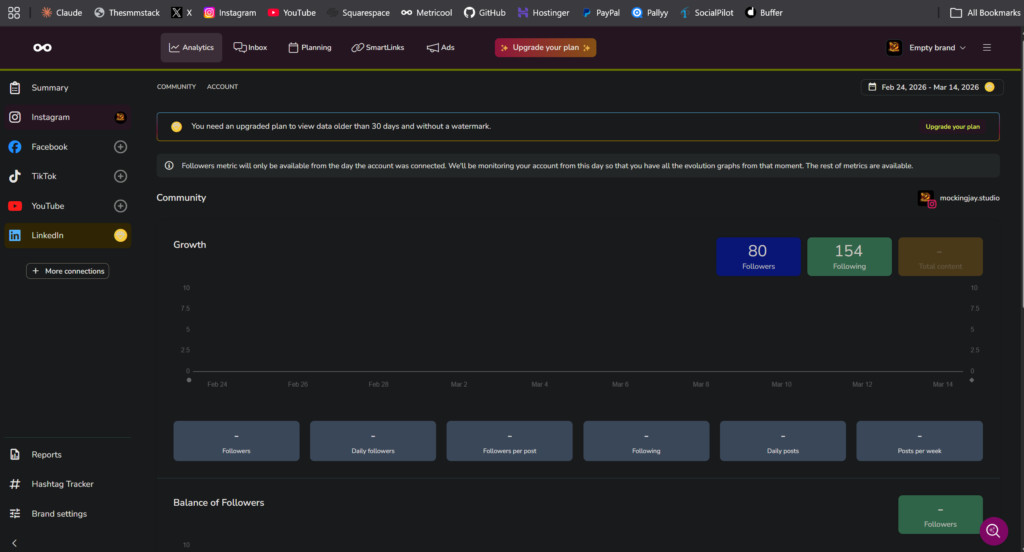
Click on Evolution in the left sidebar. This is where Metricool shows you how your social accounts are performing.
Select the platform you want to analyse from the tabs at the top. For each platform, you will see different metrics depending on what data is available. For Instagram, you get follower growth, impressions, reach, profile visits, and engagement rate. For X, you get impressions, engagements, link clicks, and retweet data. Each platform shows the metrics that matter most for that specific network.
The most useful feature in this section is the audience activity heatmap. This is a grid showing which days and times your followers are most active. The darker the cell, the more active your audience is at that time. Use this to inform when you schedule your posts — posting when your audience is actually online means more eyeballs on your content.
You can also see your best and worst performing posts, which is crucial for understanding what content actually resonates with your audience versus what falls flat. Look at the posts with the highest engagement rate, not just the most likes — engagement rate accounts for your audience size, so it is a fairer measure of quality.
One thing to note: analytics data takes 24 to 48 hours to populate for new accounts. If you just connected your platforms, give it a couple of days before expecting to see meaningful data.
Step 6 — Track Your Competitors
This is one of Metricool's standout features and it is available on the free plan — most competitors charge extra for this.
Click on Competitors in the left sidebar. Click Add Competitor and enter the social profile URL of a competitor you want to track. On the free plan you can track up to 5 competitors. On paid plans, up to 100.
Once added, Metricool starts collecting data on their posting frequency, engagement rates, follower growth, and most popular content. This takes a few days to build up, so add your competitors now and check back later.
Why does this matter? Because it shows you what is working in your niche. If a competitor posted something that got three times their usual engagement, that is a signal about what your shared audience responds to. You are not copying their content — you are learning from their data.
For freelancers managing client accounts, competitor tracking is a genuine selling point. Being able to show a client "here is how you compare to your top three competitors this month" in a report adds serious value. Clients love seeing where they stand relative to the competition.
Step 7 — Use the Best Time to Post Feature
I mentioned the Optimal Time feature in the scheduling section, but it deserves its own explanation because it is one of the most practical features Metricool offers.
When you open the post composer, look at the calendar — you will see certain time slots highlighted or marked. These are the times Metricool has calculated that your audience is most likely to see and engage with your content. The calculations are based on your actual historical engagement data, not generic "best times to post on Instagram" advice from some blog post written in 2019.
For new accounts, the data will be limited at first. But as you post and collect engagement data over a few weeks, the recommendations become more accurate and specific to your audience. If you have been posting at random times and wondering why engagement is inconsistent, this feature alone can make a noticeable difference.
You do not have to follow the suggestions every time. If you have a time-sensitive announcement or a launch post, schedule it when it makes sense. But for general content, letting Metricool guide your timing is a smart default.
Step 8 — Manage Comments and Messages from One Place
Click on Inbox in the left sidebar. This pulls in comments, mentions, and direct messages from your connected platforms into a single view.
Instead of opening Instagram, checking comments, switching to Facebook, checking comments there, then opening X — you see everything in one place. You can reply directly from Metricool without leaving the dashboard. For anyone managing more than two or three platforms, this is a significant time saver.
The inbox is not available for every platform — it works best with Instagram, Facebook, and X. Check what is supported for your specific connected accounts.
This feature is more useful than it sounds on paper. The reason most people are bad at responding to comments is not laziness — it is that checking four different apps multiple times a day is genuinely tedious. Putting everything in one inbox removes the friction.
Step 9 — Generate Reports
Click on Reports in the left sidebar. Metricool generates automated performance reports that you can download as PDF or PowerPoint files.
Select the date range and which platforms to include. On paid plans, you can add your own logo and brand colours to the report. The reports include follower growth, top performing posts, engagement metrics, and competitor comparisons if you have any set up.
If you are a freelancer sending monthly reports to clients, this feature saves hours. I used to manually screenshot analytics from each platform, paste them into a Google Doc, add some commentary, and call it a report. It took about two hours per client. Metricool generates a better-looking version in about thirty seconds.
Even if you are only managing your own accounts, pulling a monthly report and reviewing it forces you to look at the data and make decisions based on what is actually working rather than what you feel like posting.
Step 10 — SmartLinks (Link in Bio)
Click on SmartLinks in the left sidebar. This is Metricool's version of Linktree — a custom landing page that you link from your Instagram or TikTok bio.
You can add buttons linking to your website, other social profiles, recent blog posts, products, or anything else. Metricool also lets you mirror your Instagram grid so that each post links to a specific URL — useful if you regularly share content that references a link.
This is a nice bonus feature that saves you from paying for a separate Linktree subscription. The free plan includes SmartLinks, so you get scheduling, analytics, competitor tracking, AND a link-in-bio tool at no cost. That is a lot of value from one free account.
Free Plan vs Paid — When Should You Upgrade?
The free plan covers one brand with one account per platform, 50 scheduled posts per month, basic analytics, up to 5 competitor profiles, and SmartLinks. That is genuinely enough for a solo user posting a few times a week.
You should consider upgrading to the Starter plan at $20 per month when you hit one of these limits. You need more than 50 posts per month — if you are posting daily to three or more platforms, you will hit the cap. You need LinkedIn scheduling — it is not available on the free plan. You manage more than one brand. You want unlimited scheduled posts and deeper analytics with historical data. You need automated branded reports for clients.
The Advanced plan at $53 per month is worth it if you manage 5 or more brands, need team collaboration features, or want API access.
For most people reading this tutorial, the free plan is plenty to start with. Use it until you feel the limits, then upgrade.
Quick Tips to Get More Out of Metricool
Batch your scheduling. Set aside one hour a week to plan and schedule all your content for the next seven days. This is dramatically more efficient than posting in real time every day.
Check your analytics weekly, not daily. Daily fluctuations are noise. Weekly trends show you what is actually working.
Add your competitors on day one. The tracking data takes time to build up, so the sooner you add them the sooner you have useful comparison data.
Use the heatmap. Post when your audience is actually online, not when you happen to be sitting at your desk.
Customise captions per platform. A great Instagram caption is not a great tweet. Take the extra thirty seconds to tailor your message for each platform.
Try the AI caption generator on paid plans. If you are staring at a blank caption box, the AI feature can give you a starting point that you then edit in your own voice. It is not a replacement for writing, but it is a decent shortcut when you are stuck.
Related Reading
Wondering how Metricool compares to Hootsuite and Buffer? I broke it all down in Metricool vs Hootsuite vs Buffer 2026: Which Is Actually Best?
If you are still exploring your options, check out Best Free Social Media Scheduling Tools in 2026 where I ranked seven free tools including Metricool.
Frequently Asked Questions
Is Metricool free?
Yes. Metricool has a permanent free plan — not a trial — that includes scheduling up to 50 posts per month, basic analytics, competitor tracking for up to 5 profiles, and SmartLinks. You can use it indefinitely.
Does Metricool work with TikTok?
Yes. Metricool supports TikTok scheduling including the ability to add trending music. You need a TikTok Business account for this to work.
Can I schedule Instagram Reels with Metricool?
Yes. You can schedule Reels directly through the Planner. Some users have reported file size issues with larger videos — if a Reel fails to schedule, try compressing the video file first.
How long does it take for analytics to show up?
Usually 24 to 48 hours after connecting your accounts. The competitor tracking section can take a few days to populate with enough data to be useful.
Is Metricool better than Hootsuite?
For freelancers and small businesses, yes. Metricool costs $20 per month versus Hootsuite's $199 per month and includes competitor tracking that Hootsuite charges extra for. I wrote a full comparison here: thesmmstack.com/metricool-vs-hootsuite-vs-buffer